Difference between revisions of "Tutorial:Getting Started"
(bigger forward backward) |
(First batch of typo's removed, and some better (English language) sentencing here and there (note: todo, everything directly beneath Tut3.png)) |
||
| Line 9: | Line 9: | ||
* [[Installation MorphOS|MorphOS]] | * [[Installation MorphOS|MorphOS]] | ||
In Short: | In Short: | ||
| − | * download the archive, unpack it where you want to have it, add the FreePascal: assign and the path to your user-startup (or use package installer for AROS) | + | * download the archive for your specified platform, unpack it where you want to have it, add the FreePascal: assign and the path to your user-startup (or use package installer for AROS) |
== Basic use == | == Basic use == | ||
=== Commandline based === | === Commandline based === | ||
| − | + | When using the commandline compiler, you can use your favorite editor (such as VIM, Annotate, etc) and compile via command line compiler. In this Tutorial we will mainly use the FP-IDE but here is a short introduction how to use the command line compiler. | |
* open a shell | * open a shell | ||
| − | * type <code>fpc -l</code> | + | * type <code>fpc -l</code> and press enter. Free Pascal will return with some information about the installed Free Pascal compiler. If yu get this feedback returned from the compiler that means that the compiler is installed working. |
| − | * to compile a Pascal source file just type <code>fpc sourcefile.pas</code> | + | * to compile a Pascal source file, just type <code>fpc sourcefile.pas</code>. Usually Pascal sources have the extension .pas but other other Pascal compilers also uses the extension .pp or .p |
| − | * to compile a Lazarus project compile the .lpr file <code>fpc lazarusproject.lpr</code> | + | * to compile a Lazarus project compile the .lpr file <code>fpc lazarusproject.lpr</code>. In case of a Delphi compatible project, the extension used is .dpr |
=== FP-IDE === | === FP-IDE === | ||
| − | The | + | The Free Pascal IDE is ANSI based editor with embedded pascal compiler like the well known Turbo Pascal on MS-DOS. It uses the FreeVision package which is a open source package comparable to TurboVision used in Turbo Pascal. It needs a screen with at least 8 colors, although it works with 4 color screen as well but in that case things look a little bit strange and some text maybe not be easy to read. |
| − | To start the IDE navigate to the <code>PP</code> folder and find the <code>FP-IDE</code> Icon. | + | To start the IDE, navigate to the <code>PP</code> folder and find the <code>FP-IDE</code> Icon. |
[[File:Tut1.png]] | [[File:Tut1.png]] | ||
| − | Double click the <code>FP-IDE</code> Icon to start the Editor. | + | Double click the <code>FP-IDE</code> Icon to start the Editor. The editor will then present you the FP-IDE Desktop. At the same time the IDE will also open a Shell window where the output (if any) of your program will appear when it is run from within the editor. So, it would be good to arrange the windows in such a way that you are able to see both at the same time. |
[[File:Tut2.png]] | [[File:Tut2.png]] | ||
| − | In the window at top you can see the the menu line | + | In the window, at the top, you can see the the menu line. It's an old DOS based program. The menu that the IDE uses is a bit different than your typical Amiga menu. You can use the mouse to navigate to the menu's and press the left mouse button to open and select menu entries. Or you can use the keyboard and press Left Alt-Key and one of the red chars short-cut of the Menu entries to open the Menu, select an Entry again with the red marked char or use cursor keys and enter key to select a Menu Entry. |
| − | + | The middle part of the IDE leaves room for our editor windows that will be used later. | |
| − | The lower hotkey line shows some shortcuts, very useful | + | The lower hotkey line (status bar) shows some often used shortcuts such as Open and Compile, which are very useful |
| − | + | Since we would like to create a new file, we navigate to the <code>File</code Menu and select <code>New</code> | |
| − | An editor window | + | An editor window will open (you can open multiple editor windows, so go ahead and play around to get yourself familiar with how these windows work). |
[[File:Tut3.png]] | [[File:Tut3.png]] | ||
Revision as of 19:50, 11 February 2017
Start Next
This page is available in german
Installation
Check the installation guide for your platform:
In Short:
- download the archive for your specified platform, unpack it where you want to have it, add the FreePascal: assign and the path to your user-startup (or use package installer for AROS)
Basic use
Commandline based
When using the commandline compiler, you can use your favorite editor (such as VIM, Annotate, etc) and compile via command line compiler. In this Tutorial we will mainly use the FP-IDE but here is a short introduction how to use the command line compiler.
- open a shell
- type
fpc -land press enter. Free Pascal will return with some information about the installed Free Pascal compiler. If yu get this feedback returned from the compiler that means that the compiler is installed working. - to compile a Pascal source file, just type
fpc sourcefile.pas. Usually Pascal sources have the extension .pas but other other Pascal compilers also uses the extension .pp or .p - to compile a Lazarus project compile the .lpr file
fpc lazarusproject.lpr. In case of a Delphi compatible project, the extension used is .dpr
FP-IDE
The Free Pascal IDE is ANSI based editor with embedded pascal compiler like the well known Turbo Pascal on MS-DOS. It uses the FreeVision package which is a open source package comparable to TurboVision used in Turbo Pascal. It needs a screen with at least 8 colors, although it works with 4 color screen as well but in that case things look a little bit strange and some text maybe not be easy to read.
To start the IDE, navigate to the PP folder and find the FP-IDE Icon.

Double click the FP-IDE Icon to start the Editor. The editor will then present you the FP-IDE Desktop. At the same time the IDE will also open a Shell window where the output (if any) of your program will appear when it is run from within the editor. So, it would be good to arrange the windows in such a way that you are able to see both at the same time.

In the window, at the top, you can see the the menu line. It's an old DOS based program. The menu that the IDE uses is a bit different than your typical Amiga menu. You can use the mouse to navigate to the menu's and press the left mouse button to open and select menu entries. Or you can use the keyboard and press Left Alt-Key and one of the red chars short-cut of the Menu entries to open the Menu, select an Entry again with the red marked char or use cursor keys and enter key to select a Menu Entry. The middle part of the IDE leaves room for our editor windows that will be used later. The lower hotkey line (status bar) shows some often used shortcuts such as Open and Compile, which are very useful
Since we would like to create a new file, we navigate to the File</code Menu and select New
An editor window will open (you can open multiple editor windows, so go ahead and play around to get yourself familiar with how these windows work).

On the left upper side we have the close Button (the little green square). The title line with the current file name can be used to move the window around and double click maximize or restore the window (of course the size has to be reduced before to see an effect, just keep reading). The one at the upper right side indicates the number of the editor window. The green arrow next to it is used to maximize and restore the window.
On the right side you can see a checkered area with two arrow which represents the scrollbar for the editor text, it works exactly like the Amiga one (But it is not proportional just a blue square represent the current position as visible at the lower border). The lower border as the same scroll bar for the horizontal direction. Between the two scrollbars in the lower left corner is the size gadget, click and drag to resize the window.
on the left lower side the current line and char in line is shown, 1:1 at the moment.
In the editor you can see the blinking cursor where you can type program.
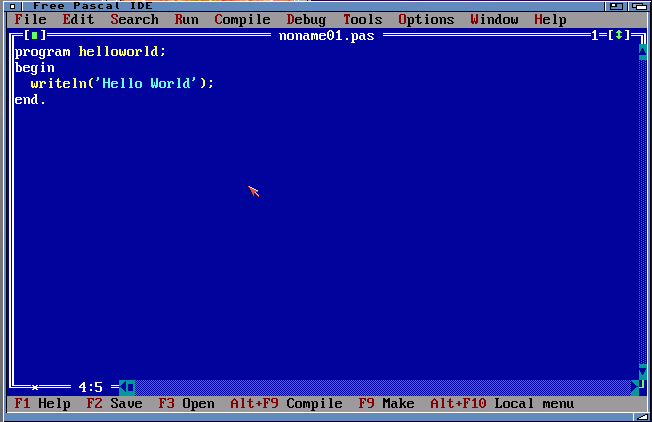
We want to type in out very first program, of course "Hello World"
program helloworld;
begin
  writeln('Hello World');
end.
Sometimes it's difficult to find the right quotation mark, especially on UAE (on a german keyboard seems Alt+Ä does work, for english it should be the single quotation mark directly on the keyboard). If you found the right key it should show the quotation mark in turquoise color, if it is yellow then it's the wrong one. Notice that behind the last end there should be a point.
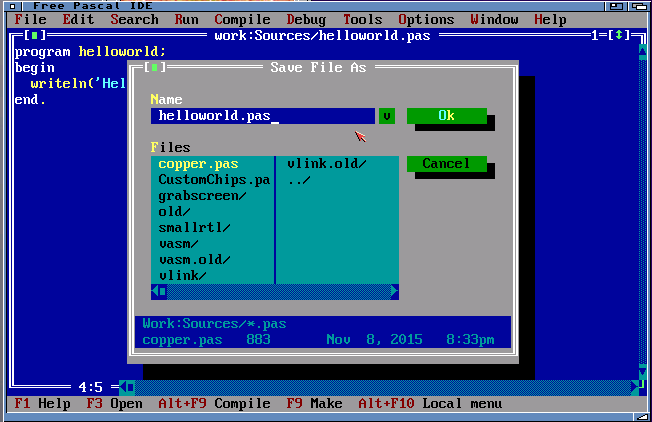
Before we can compile and run that, we have to save it. To Save the file one can use the Menu entry or press F2. The save as dialog Window will open. To navigate type the path into the edit field for Name and press Enter key e.g. work: the contents of the Drawer/Device will be shown in the area underneath. Use Mouse or cursorkeys + Enter to navigate where you want to save your file (../ means parent directory and is always at the end of the list). e.g. Work:Sources in this example as you can see in the lower part of the dialog window.
In the Name edit field the currently selected file name is written delete the name and type in helloworld.pas and press enter or press OK.
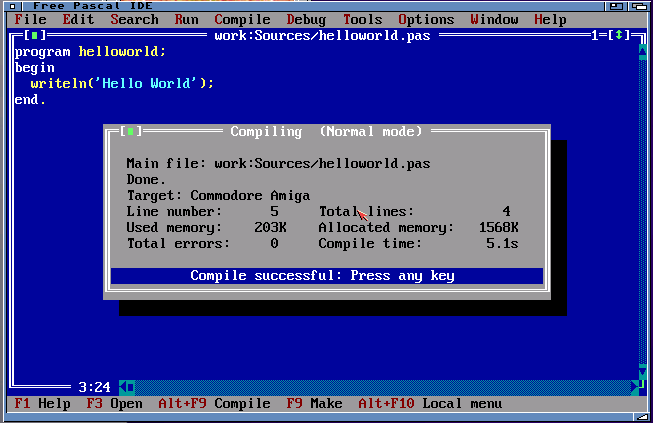
Now we can compile our program, press F9 or choose Compile from the Compile Menu. Depending on your computer (especially Hardrive speed) it will need some time to compile (a real Amiga around 30 s, NG Amiga should be only some seconds).
FP-IDE should now tell you "Compile successfully: Press any key" if not, it found some errors. A green window opens with the error messages. Try to check the source carefully for typing errors (also care about the colors, which can give you a hint about wrong chars). The compiler should tell you the position of error, navigate to the error and press enter to jump to the position of the error. If you have no idea maybe you want to ask me on Forum or IRC whats wrong.
To run our program press Ctrl-F9 or choose Run from the Run Menu. The Editor window closes very fast and opens again. The Output of the program can be seen in the second window.
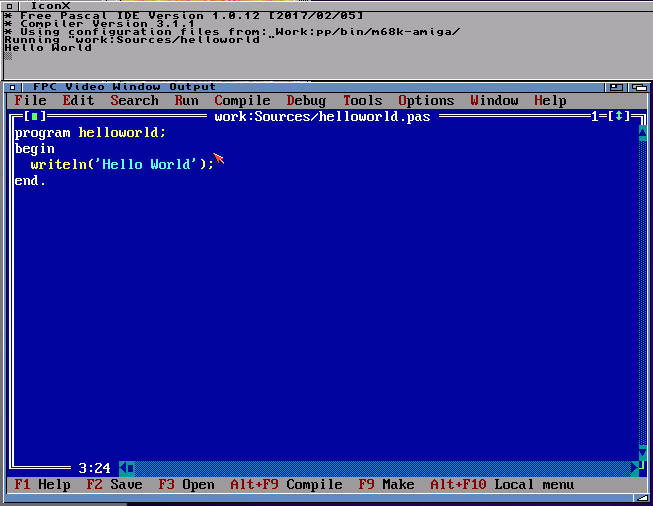
Congratulation you managed to write, compile and run your first Program on Amiga using Freepascal and FP-IDE. Now you can extend your program for a more meaningful program. Do not forget to save your progress (with F2 or Menu) compile (with F9) and run it (Ctrl-F9).
This Tutorial should not be a complete pascal tutorial. If you are not used to Pascal you should try to find one of the many pascal Tutorial and try some parts on your Amiga (CRT and GRAPH units are not available so jump over parts using graphics for now). If you found a good Pascal tutorial you should announce the link to it here for other people.
Start Next


