Embedded Images
Introduction
This page describes how to use embedded bitmap images and palettes in Amiga Free Pascal.
Preparation
We start with a PNG file created by Gimp for example and transferred to Amiga (I used Gimp already to scale the colors down to 256 colors). With PPaint the final color depth and palette ordering is done, the image can be also resized but cutting is also possible in the converter program. For the final conversation PicCon 2.5demo is used.
Image to Program
Prepare Image
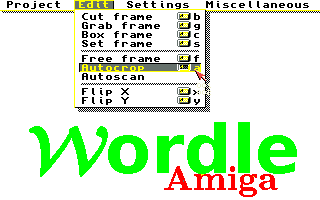
First you need to load the iff image created by PPaint to PicCon "Project/Open Picture" it will be shown on the screen. If the image contains a lot of empty background area you might want to cut it. You can directly select the area on the screen or use the "Edit/Autocrop" function.
You will get a black border around the area that will be exported. There are three ways to bring your image to you program (and finally to the screen) the first two options will embed the data to the executable (therefore you can just send a single file) and the last option will load the data from external files (which makes a smaller executable and makes it possible for smaller footprint because you can load the data later on demand)
Prepare Settings
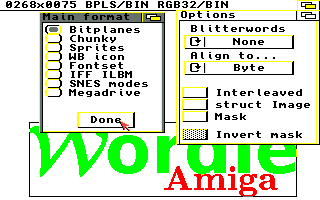
We need to set the format for the data to be exported, usually we want to have plain bitplanes (which is the default, be better check) "Settings/Imageformat"
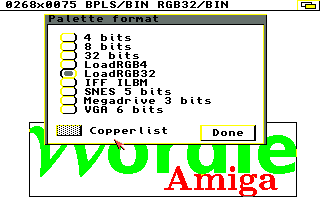
We also need to set the palette format in "Settings/Paletteformat"
If we use OS 3+ it is best to use the LoadRGB32 format (Free Pascal default). OS 1.x does not know the LoadRGB32 functions, therefore one can use the LoadRGB4 format if the target is OS 1.x. But if you use the latest Free Pascal compiler for OS 1.x you can use LoadRGB32 for here as well (there is a wrapper for that in the pascal amiga units)
Save Format
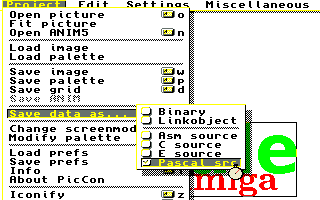
As Last you need to define which format you want to save, ultimately define which way you want to bring the data to your program (the aforementioned three options) "Project/Save Data as..."
Data as Include
PicCon can directly create Pascal code which can be used as includes with only tiny changes (or you can copy paste the code to your program for single source file programs) Select "Pascal src" as saveformat. Choose "Project/Save Image" to save the image data as a pascal include file (for example MyImage.inc). Choose "Project/Save palette" to save the palette data as an include file (for example MyPalette.inc). Both files are text files, therefore you can open them with any text editor, 2 things you should notice.
First both constants created are named 'mydata' which is bad if you want to include them into the same file, so maybe rename one (or both) of these constants. For this Tutorial we assume the names where changed to MyImage and MyPalette (same as the files).
Second at the end of the binary array you will notice an additional comma ',' after the last entry, which Free Pascal does not like there, you will have to remove it (I don't know, but it seems other Pascal compilers can work with that).
Now you can include these two files to your code:
{$include MyImage.inc}
{$include MyPalette.inc}
after the screen is open one can set the palette
uses
  AGraphics;

{$include MyPalette.inc}

procedure SetPalette(Screen: PScreen);
begin
  LoadRGB32(@Screen^.ViewPort, @MyPalette[0]);
end;
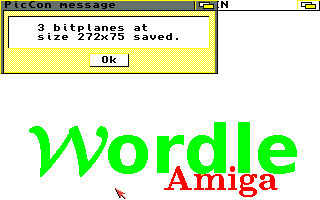
When you want to draw the actual image to that screen you need a TImage structure to use the binary in the include for that you need the size (width and height) and number of bitplanes of the saved image, all 3 values are shown when the image is successfully saved.
for this example it is 272 width, 75 height and 3 bitplanes = depth.
To draw this Bitmap you need to set the TImage structure and draw to rastport like that:
uses
  AGraphics;

{$include MyImage.inc}

// raw the image to rast port
procedure DrawImage(RP: PRastPort);
var
  MyImage: TImage;
begin
  MyImage.LeftEdge := 0;
  MyImage.TopEdge := 0;
  // this 3 values are shown on finishing
  MyImage.Width := 272; // width of image
  MyImage.Height := 75; // Height of image
  MyImage.Depth := 3; // number of bitplanes
  //
  MyImage.ImageData := @myData[0]; // pointer to the actual image data
  //
  MyImage.PlanePick := (1 shl MyImage.Depth) - 1;
  MyImage.PlaneOnOff := 0; // to no skip any Planes
  MyImage.NextImage := nil;

  DrawImage(RP, @MyImage, 0,0); // draw the actual Image at 0,0 in the rastport
end;
Data as object file
Choose saveformat "Linkobject". (Project/Save data as.../Linkobject)
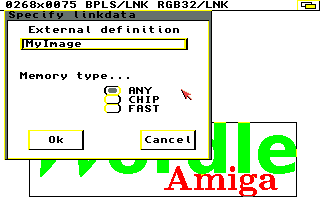
Choose "Project/Save Image" to save the image data as a link file, it will ask for a name for the external definition, which is the name you will use in the pascal to identify that image for example 'MyImage' and the memory location for example 'ANY'. Save that as object file e.g. MyImg.o Choose "Project/Save palette" to save the palette data as a link file, it will ask for a name for the external definition, which is the name you will use in the pascal to identify this palette for example 'MyPalette' and the memory location for example 'ANY'. Save that as object file e.g. MyPal.o
Now you can include these two files to your code:
{$L MyImg.o}
var
  MyImg: Pointer; external name 'MyImage';

{$L MyPal.o}
var
  MyPal: LongWord; external name 'MyPalette';
after the screen is open one can set the palette
uses
  AGraphics;

{$L MyPal.o}
var
  MyPal: LongWord; external name 'MyPalette';

procedure SetPalette(Screen: PScreen);
begin
  LoadRGB32(@Screen^.ViewPort, @MyPal);
end;
When you want to draw the actual image to that screen you need a TImage structure to use the binary in the include for that you need the size (width and height) and number of bitplanes of the saved image, all 3 values are shown when the image is successfully saved.
for this example it is 272 width, 75 height and 3 bitplanes = depth.
To draw this Bitmap you need to set the TImage structure and draw to rastport like that:
uses
  AGraphics;

{$L MyImg.o}
var
  MyImg: Pointer; external name 'MyImage';

// raw the image to rast port
procedure DrawImage(RP: PRastPort);
var
  MyImage: TImage;
begin
  MyImage.LeftEdge := 0;
  MyImage.TopEdge := 0;
  // this 3 values are shown on finishing
  MyImage.Width := 272; // width of image
  MyImage.Height := 75; // Height of image
  MyImage.Depth := 3; // number of bitplanes
  //
  MyImage.ImageData := @MyImg; // pointer to the actual image data
  //
  MyImage.PlanePick := (1 shl MyImage.Depth) - 1;
  MyImage.PlaneOnOff := 0; // to no skip any Planes
  MyImage.NextImage := nil;

  DrawImage(RP, @MyImage, 0,0); // draw the actual Image at 0,0 in the rastport
end;
